
"Pobody's nerfect."
And as cheesy as that saying is (maybe even cringy), it's incredibly true. Even when it comes to putting together a standing desk.
Even those who consider themselves to be "handy" can end up making a mistake or two during the assembly process.
So, I'm here to share what your assembly instructions most likely leave out: 5 mistakes to avoid when putting together your new sit stand desk (and what you should do instead).
5 Mistakes To Avoid When Assembling A Standing Desk
1. Rushing through the assembly process2. Not using a threadlocker or a star lock washer with the bolts
3. Fully tightening the screws and bolts too soon during the assembly
4. Screws and bolts aren't fully secure
5. Feet glides are not adjusted properly
#1 Rushing Through The Assembly Process
When we try to do anything too quickly, we’re bound to make mistakes. You run the risk of missing a small, but highly important instruction that can make or break the overall assembly of your new desk.
Here's what you should do instead
- Take a pause between each step to help prevent from going too quickly.
- Read the instructions twice (or more)
1st read = before you begin to assemble
2nd read = while you follow along and complete the assembly steps - Pay special attention to any special tips in the instructions. These are often times shown with bold lettering, an asterisk (*), or inside of a box to make them easier to find.
It takes a lot more time to have to go back and fix a mistake than it is to slow down a bit and carefully read and follow the assembly instructions.
Save yourself a potential headache and don’t rush through your desk assembly.
#2 A Threadlocker and Star Lock Washers Are Not Being Used
By not using a threadlocker and/or a star lock washer on the bolts used to assemble your standing desk, you’re increasing the probability that the desk will end up becoming unstable.
But, what even are threadlocker and star lock washers?
Threadlocker
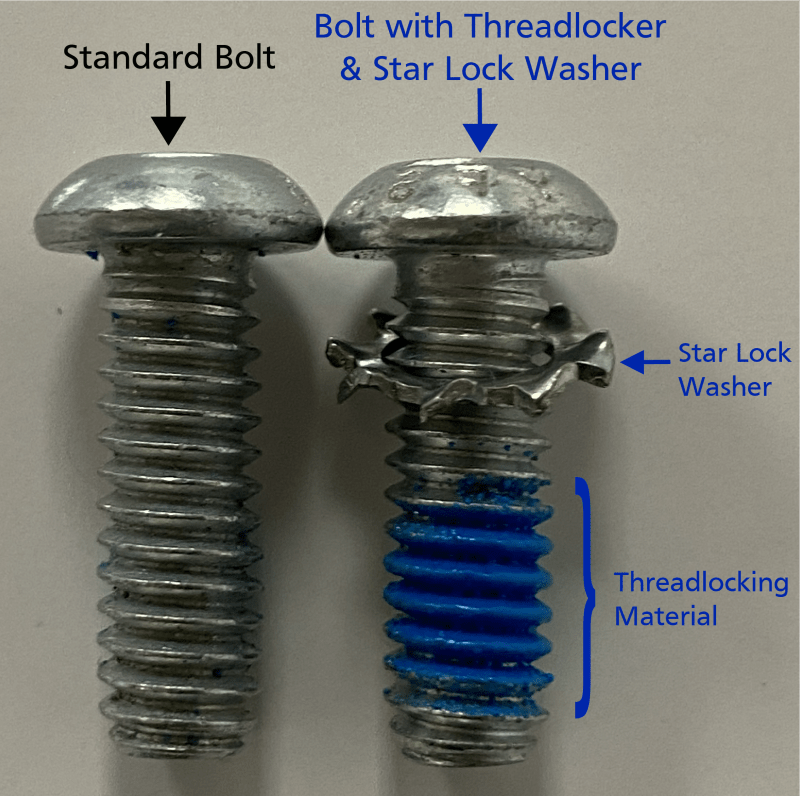
A threadlocker is an adhesive used to help lock and seal threaded fasteners, such as screws or bolts. When applied directly to a fastener’s threads, the adhesive helps to prevent any loosening, leakage, or corrosion.
While the purpose of a fastener’s threads is to bind various materials together (ie. wood or metal) and create a tighter engagement than if you were to use a fastener without threads (ie. nail).
The consequence of not using a threadlocking material
Simply using a fastener with threads (no threadlocker) doesn’t guarantee that the seal is 100% perfect. There is still space and gaps between the threads and the material. Those gaps leave the bolts susceptible to shifting and loosening over time. And what does the loosening of bolts lead to? Standing desk wobble and instability.
Not exactly ideal, but I have good news! There’s a way to significantly decrease the possibility of that occurring.
Here’s what you should do instead
If the hardware packet provided by the manufacturer includes bolts without threadlocker, buy some of the adhesive yourself.
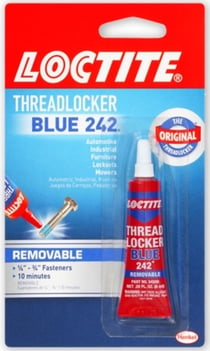
There are various threadlocking manufacturers, with one of the most recognized being Loctite. Loctite’s THREADLOCKER BLUE 242 is one option to prevent the loosening of your metal fasteners. You can find this product at Home Depot for $6.47 (price updated 1/10/2020) or many other retailers.
It’s also relatively simple to use. For most brands, all you have to do is apply a few drops of the adhesive to the bolt’s threads at the area where it will engage with the nut or material of the component being attached.
This inexpensive, and user-friendly investment increases the stability of your standing desk and improves its overall assembly.
Star Lock Washers

Star lock washers have external metal teeth that “bite” the materials it sits between to help create a tight grip and prevent them from shifting.
The consequence of not using a star lock washer
By choosing to use a simple flat washer, or no washer at all, in conjunction to the bolts during the desk assembly, there is an increased chance of the bolts loosening and shifting over time. When the bolts begin to loosen, the desk’s assembly weakens. Then, you will start to experience desk wobble and instability.
Here’s what you should do instead
Use star lock washers in tandem with the bolts when assembling your sit stand desk. If the hardware packet provided by the manufacturer does not include any, you can easily and inexpensively purchase some online or at your local hardware store.
In the image below, you’ll see that the washer’s teeth are angled both towards the head of the bolt and the surface of other adjacent material. For desk assembly, that adjacent material will often be one of the metal components of the desk, such as a metal desk leg or a metal bracket.
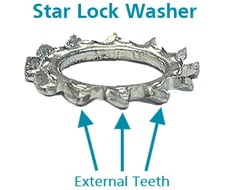
When the bolt is fully tightened, the washer’s teeth “bite” into the bolt’s head and the metal component we’re attaching it to. This helps prevent the bolt from rotating over time.
Now that there’s a significantly less chance that the bolt will shift with the help of the star lock washer, your desk will be much more sturdy.
#3 Screws & Bolts Are Fully Tightened Too Soon
The third common installation mistake is fully tightening each screw or bolt right away as each is being inserted. Here’s a brief example to explain what I mean.
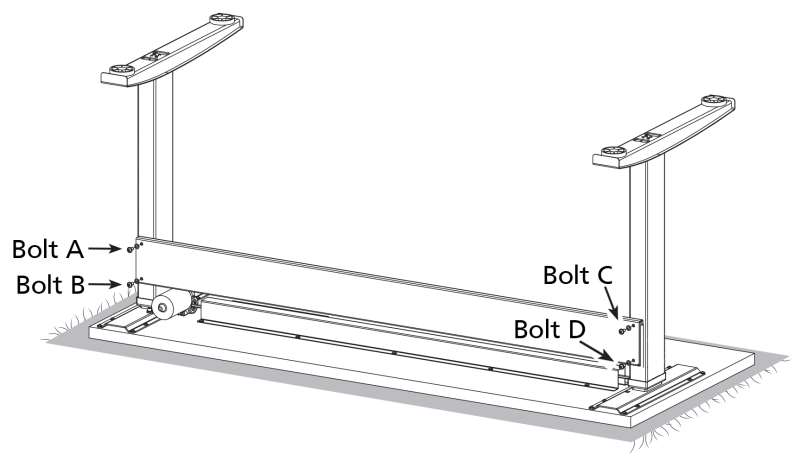
Example 1: You have to insert 4 bolts into pre-drilled holes to attach the desk’s cross support - Bolt A, Bolt B, Bolt C, and Bolt D.

1. You first insert Bolt A and immediately fully tighten it.
2. Then, you insert Bolt B and immediately fully tighten it.
3. You continue this pattern for Bolt C and then Bolt D.
If you follow that method, you’re tightening the screws too soon.
The consequence of tightening the screws or bolts too quickly
It will be come increasingly difficult or impossible to just insert the last screws or bolts, let alone tighten them.
Each pre-drilled hole for the screws has a little bit of play or some ability to shift and move. When a screw is fully tightened, the amount of play or tolerance of each remaining hole decreases.
This is especially true when attaching one metal component to another metal component in comparison to those made of wood, since metal is a much less forgiving or flexible material.
Let’s go back to our example and identify the amount of play or movement for each pre-drilled hole.
Example 2: You have to insert 4 bolts to attach the desk’s cross support - Bolt A, Bolt B, Bolt C, and Bolt D.
1.You first insert Bolt A into the pre-drilled holes and fully tighten it. The result: the other three holes don’t have as much movement to maintain alignment.
2. You then insert Bolt B and fully tighten it. The result: the last two holes have even less play. Now it becomes much more difficult to align those two holes and successfully insert the bolts.
3.Bolt C is inserted and fully tighten, also you notice it’s much more difficult to do so. The result: there is very little or no play in the last pre-drilled hole.
While I can’t say it’s 100% impossible to insert Bolt D, it is highly likely that either:
1. You won’t be able to fully insert the bolt (there will be part of the bolt sticking out), or
2. You won’t even be able to fit the bolt into the pre-drilled hole, let alone screw it in.
Here’s what you should do instead
Loosely insert all required screws or bolts for the component you’re trying to attach. Then, once all are loosely attached in the pre-drilled holes, fully tighten them.
By first inserting all screws without fully tightening them, each pre-drilled hole has enough room to slightly shift. You’ll now have a much easier time trying to align and insert each screw.
Let’s go back to our example, but this time, we’ll follow the correct way to insert and tighten the bolts.
Example 3: You have to insert 4 bolts to attach the desk’s cross support (Bolt A, Bolt B, Bolt C, and Bolt D)
1.Loosely insert Bolt A in one of the pre-drilled holes. Repeat for Bolts B, C, and D. None of the bolts should be fully tightened.
2.Fully tighten Bolt A. Repeat for Bolts B, C, and D.
3. All bolts are correctly aligned and inserted.
Make sure to also pay attention to your desk’s assembly instructions. Some may explicitly tell you when to keep a bolt loose or when to fully tighten it.
*Note: Be sure not to over tighten and strip the screws or bolts.
#4 Screws & Bolts Are Not Fully Tightened
Did you make sure to fully tighten all screws and bolts when assembling your desk? It's often easily overlooked by many users, and results in an even more unstable sit stand desk.
To clarify, I don’t mean that you should fully tighten every screw or bolt as each are being inserted (see mistake #3). Once all screws are aligned and loosely inserted, some users make the mistake of only partially tightening the fasteners.
The consequence of not tightening the bolts and screws completely
The desk’s components will shift, and the desk will have wobble and be more unstable.
There are a few reasons why this can happen:
1. You simply don’t take the time to make sure the fastener is tightly inserted.
2. You’re unable to get enough leverage to create a tight seal for the fasteners.
This typically occurs when people use the tools, such as an Allen wrench, that was supplied by the manufacturer in the hardware packets.
It’s no surprise that these “free” tools are pretty low quality, often being quite small and not very robust. While it’s a convenience, especially for users who don’t have their own set of tools at home, those provided tools are often times unable to provide enough leverage to fully tighten the fasteners.
3.The screws and bolts don’t have threadlocker and/or utilize star lock washers to create an even tighter fit.
A threadlocker is an adhesive applied to the threads of screws or bolts to help prevent loosening, leakage, or corrosion when used during assembly. Star lock washers have external teeth that help to “bite” into the installation surfaces to prevent movement. You can read more about these in Mistake #2.
Here’s what you should do instead.
First, make sure you take your time when inserting the bolts - don’t rush through it.
Secondly, if possible, use more robust tools than those provided in the desk’s hardware packets.
Lastly, use a threadlocker and/or star lock washers to create a tighter fit for the fasteners. This is even more crucial for those who opt to use the manufacturer-provided tools.
By following these tips, you will adequately tighten all screws and bolts and prevent any additional desk instability and wobble.
*Note: There is such a thing as over-tightening fasteners. Tightening them too much will cause them to strip.
#5 Feet Glides Are Not Properly Adjusted
Properly adjusting the glides on the underside of the desk feet is often overlooked during the assembly process. Although those feet glides are small in size, they can have a large impact on whether or not your desk wobbles.
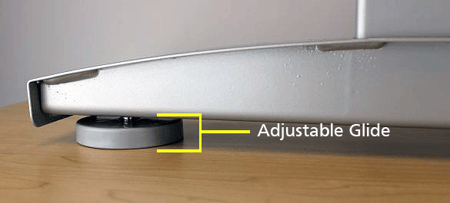
Most sit stand desks are equipped with adjustable feet glides. There are various glide manufacturers, but many tend to be round and you can adjust the height of the glides by turning them clockwise or counterclockwise.
If you’re not quite sure of a foot glide’s purpose, let’s look at it this way.
Have you ever been out at a restaurant and had the bad luck of getting the wobbly table that rocks back and forth? Most of us can answer, “yes.” So, what will many of us do?
We first find which table leg or foot is uneven - identifying where there is a gap between the table foot and the floor. Then, to stop that movement in the table, we fill that gap with something, such as a few coasters or a folded up napkin. Now, the table wobble is gone.
In this common scenario, the coasters or napkins are essentially a McGyver-ed foot glide. They’re used to fill the open space between the table leg or foot and the uneven floor, eliminating the wobble.
The consequence of not properly adjusting feet glides: you desk will more than likely have some movement or wobble since there isn’t anything to fill the gap between any unevenness between the floor and the desk’s feet.
Here’s what you should do instead.
First, complete the entire assembly process and place your new desk wherever you’d like it to live.
Then, get on the ground (I know, not ideal), and manually twist and turn each glide individually to adjust their heights.
It's best to place a spirit level on the worksurface to help determine how much adjustment each foot glide may need. Use the spirit level on each side of the worksurface. This will help to make sure that each foot glide is properly adjusted.
Final Thoughts
By avoiding these five common mistakes, assembling your standing desk will be more efficient and effective. It will also help to improve the stability and longevity of the desk.
Still have questions about the assembly process for your sit stand desk? We're here to help!
Connect with us by submitting the form below.
COMMENTS